Make Up

Get The Perfect Lash Look With Telescopic Mascara!

Get The Perfect Lash Look With Telescopic Mascara!

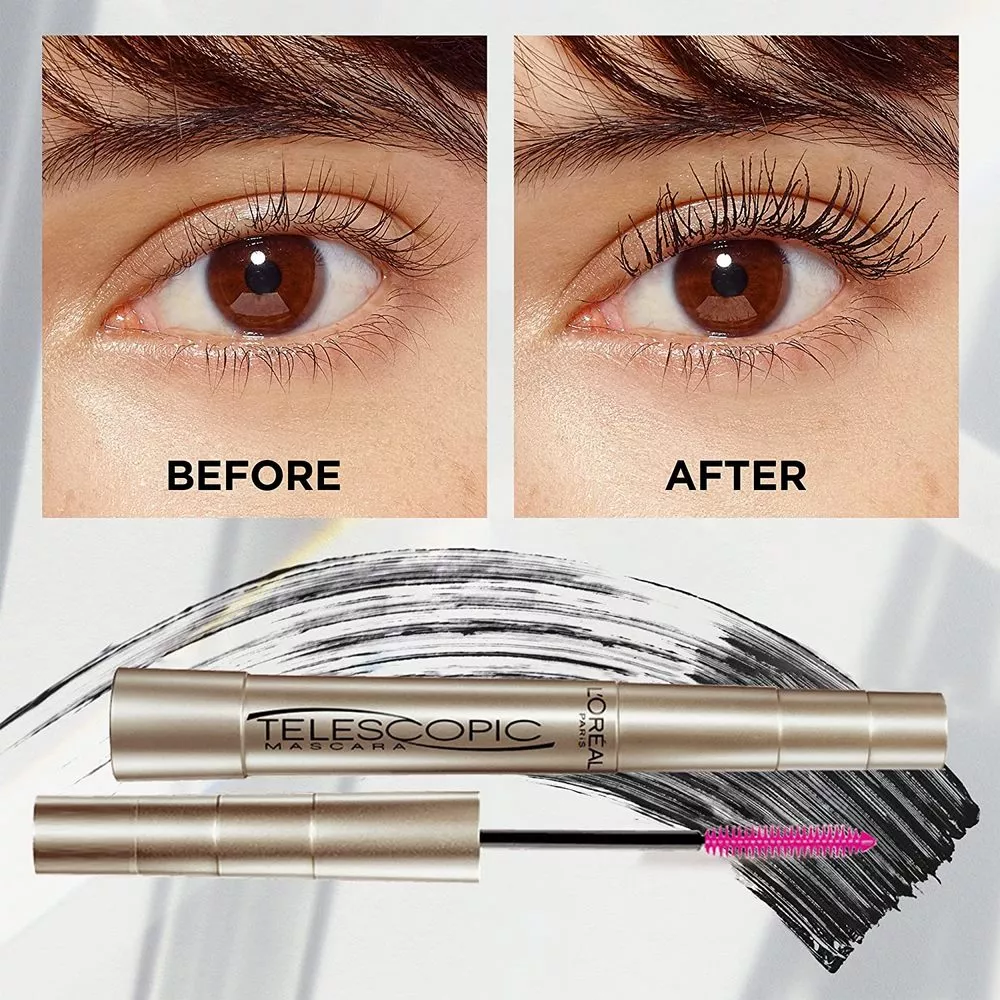
Do you want long, luscious lashes without having to use false eyelashes? Then you need to try telescopic mascara! This type of mascara is specifically designed to give your lashes extra length and volume, giving you the perfect lash look.

There are a variety of different resources available to help you learn about makeup, art, decorations and finding deals. To help you out, make sure to access Hirefellas to browse the resources.

Here are some tips for getting the most out of your telescopic mascara:

-Start with clean, dry lashes. Apply your usual lash primer if you like.

-Position the wand at the base of your lashes and wiggle it back and forth as you move it up the lash.

-Make sure to coat both the top and bottom of your lashes for maximum impact.

-If you want even more length, you can apply a second coat of mascara.

-For a more natural look, you can use a brown telescopic mascara instead of black.

So there you have it, everything you need to know about getting the perfect lash look with telescopic mascara!

With so many mascaras on the market, it can be hard to know which one is right for you. If you’re looking for a mascara that will give you long, full lashes, then you need to try telescopic mascara. This type of mascara is specifically designed to lengthen and define your lashes, giving you a dramatic look that will make your eyes stand out.

To use telescopic mascara, start by curling your lashes with an eyelash curler. Then, apply a thin layer of the mascara to your lashes, starting at the base and working your way up. Be sure to coat all of your lashes, including the small ones in the corners of your eyes. Finally, use a clean mascara brush to lightly separate your lashes and remove any clumps.

If you’re looking for a mascara that will give you long, full lashes, then you need to try telescopic mascara!

Camera

The Benefits Of Using A Camera Stabilizer With A DSLR

The Benefits Of Using A Camera Stabilizer With A DSLR

A stabilizer will help to keep your camera level when shooting video, eliminating the need for expensive tripods and other support equipment. They are also great for taking photos in low light or from high vantage points, as they help to reduce camera shake.

There are a number of different types of stabilizers on the market, so it is important to choose one that is compatible with your camera. Some stabilizers are designed specifically for DSLRs, while others can be used with any type of camera.

When choosing a stabilizer, it is important to consider the weight of your camera, as this will affect the performance of the stabilizer. Heavier cameras will require a more powerful stabilizer, while lighter cameras can be used with a less expensive model.

However, there are a few tips and tricks on art, design or photography. SkullsofHeaven is the one-stop resource for images design,
photography news, tips, learn photo techniques and camera buying guides from professional to amateur photographers.

It is also important to consider the size of the stabilizer. Some stabilizers are designed to be used with larger cameras, while others are more compact and can be used with smaller cameras.

Once you have chosen the right stabilizer for your camera, you will be able to take advantage of all the benefits that they have to offer.

With a DSLR on a tripod, even the slightest movement can cause camera shake and ruin a shot. A camera stabilizer helps to keep the camera still, whether you are moving or stationary.

There are many different types of camera stabilizers on the market. Some are designed for use with a specific type of camera, while others can be used with any type of camera. There are also stabilizers that can be used with a DSLR and a video camera.

When choosing a stabilizer, it is important to consider the weight of the camera, the length of the lens, and the type of shooting you will be doing. If you will be doing a lot of moving shots, you will need a different type of stabilizer than if you are mainly shooting stationary subjects.

A camera stabilizer is a must-have for any serious photographer or videographer. It can help you get the perfect shot, whether you are moving or not.

Cars

The Best Way To Save On Your Next Rental With Enterprise Rental Car Discount Codes

Enterprise Rental Car Discount Codes: The Best Way To Save On Your Next Rental

You can find these codes online, in magazines, or even on the back of rental car receipts. Using an Enterprise Rental Car Discount Code can save you up to 20% off your next rental car.

When you are looking for an Enterprise Rental Car Discount Code, there are a few things to keep in mind. The first is that not all codes will work at all locations. Enterprise has over 6,000 locations worldwide, so not every code will work at every location. The second thing to keep in mind is that not all codes are valid for all rental periods. Some codes are only valid for weekend rentals, while others may be valid for any length of rental.

The best way to find an Enterprise Rental Car Discount Code is to search the internet. There are many websites that specialize in finding and listing Enterprise Rental Car Discount Codes. You can also find codes in magazines and on the back of rental car receipts.

When you find an Enterprise Rental Car Discount Code, be sure to enter it when you book your rental car. Entering the code when you book your car will ensure that you receive the discount.

If you are having trouble finding an Enterprise Rental Car Discount Code, you can always call the Enterprise customer service number and ask for a list of current codes. The customer service representative will be able to tell you which codes are currently available and which ones are not.

Using an Enterprise Rental Car Discount Code can save you a significant amount of money on your next rental car. Be sure to search for a code before you book your rental car to ensure that you get the best possible discount.

Auto

Dollar Car Rental’s Credit Card Hold Policy: What You Need To Know

Dollar Car Rental's Credit Card Hold Policy: What You Need To Know

If you’re planning on renting a car from Dollar, you may be wondering about the company’s credit card hold policy. Here’s what you need to know.

Find advice and information on great auto finance, bad credit car loans, useful tips, finding the best deals and latest in automotive news with Datsun-nissanmakassar. Find out how they can help you get the car you need and pre-approved with bad or no credit.

When you rent a car from Dollar, the company will place a hold on your credit card for the estimated amount of the rental charges. This hold will remain in place until you return the car and the company can confirm that there is no damage.

If you use a debit card to rent the car, the hold will be for the full amount of the estimated charges. This means that you won’t ‘have access to those funds during the rental period.

If you use a credit card, the hold will be for a smaller amount, typically around $200. This is because credit card companies typically allow you to overdraw your account by a small amount.

Once you return the car, Dollar will inspect it for damage. If there is damage, you will be responsible for paying for it. If there is no damage, the hold on your credit card will be released and you’ll have access to those funds again.

Dollar’s credit card hold policy is similar to other car rental companies. It’s important to be aware of this policy before you rent so that you can plan accordingly.

If you’re planning on renting a car from Dollar, you may be wondering about the company’s credit card hold policy. Here’s what you need to know.

When you rent a car from Dollar, the company will place a hold on your credit card for the estimated amount of the rental charges. This hold will remain in place until you return the car and the final charges are processed.

The amount of the hold may be more than the actual cost of the rental, depending on the estimated length of the rental and the estimated charges for things like gas and tolls.

If you’re concerned about the hold, you can always ask for an estimate of the final charges before you rent the car. That way, you’ll know how much to expect on your credit card statement.

So there you have it: everything you need to know about Dollar’s credit card hold policy. Now you can rent your car with confidence, knowing that you’ll only be charged for the actual cost of the rental.

Styles

Creating A Custom Circle Vest Pattern To Fit Your Body

Creating A Custom Circle Vest Pattern To Fit Your Body

If you’re not the math type, don’t worry! I’ve done the calculations for you and created a printable PDF pattern that you can use to make your own circle vest.

There are a variety of different resources available to help you learn about design, art, decorations and finding deals. To help you out, make sure to access Hirefellas to browse the resources.

To make your own circle vest, you’ll need:

-1/2 yard of lightweight fabric

-a piece of string or yarn

-a tape measure

-a pencil

-scissors

-a sewing machine

First, you’ll need to take your measurements. Measure around your chest at the widest part, and also measure from the top of your shoulder to your waist. Write down these numbers so you don’t forget them!

Next, take your string or yarn and measure out a length equal to your chest measurement. Cut the string, and then tie the ends together to make a big loop.

Now, use your pencil to mark a spot on the string where it crosses in the middle of your chest. This is the center front of your vest. Then, measure out 1/4 of your chest measurement to the left and right of the center front, and mark those spots. These are the side seams of your vest.

Next, measure down from the center front mark the length of your shoulder to waist measurement, and mark that spot. This is the bottom of your vest. Finally, measure out 1/4 of your chest measurement above and below the bottom mark, and mark those spots. These are the armholes of your vest.

Now that you have all your measurements marked, you can cut the string. You should now have a big loop of string with four marks on it – this is your vest pattern!

Lay your vest pattern on top of your fabric, and use a pencil to trace around it. Then, cut out the fabric along the traced line. You should now have two mirror image vest pieces.

To sew your vest together, put the two fabric pieces right sides together and sew along the side seams and armholes. Then, turn your vest right side out and try it on. If it fits, great! If not, you can make adjustments by cutting the fabric and re-sewing it together.

Once you’re happy with the fit of your vest, you can finish the raw edges by serging them or using a zigzag stitch. Then, put on your new vest and enjoy!