Styles

Creating A Custom Circle Vest Pattern To Fit Your Body

Creating A Custom Circle Vest Pattern To Fit Your Body

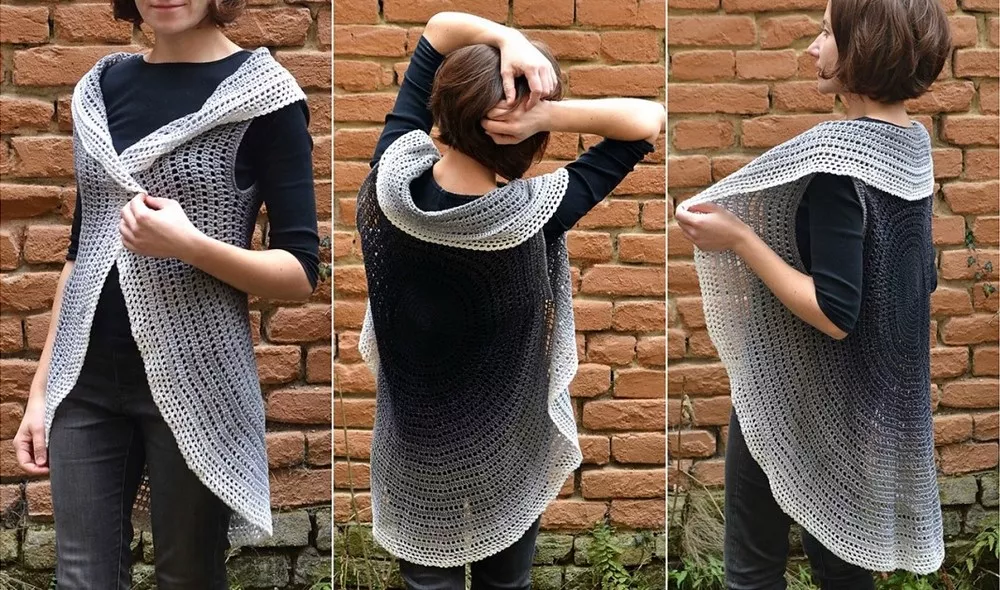
If you’re not the math type, don’t worry! I’ve done the calculations for you and created a printable PDF pattern that you can use to make your own circle vest.

There are a variety of different resources available to help you learn about design, art, decorations and finding deals. To help you out, make sure to access Hirefellas to browse the resources.

To make your own circle vest, you’ll need:

-1/2 yard of lightweight fabric

-a piece of string or yarn

-a tape measure

-a pencil

-scissors

-a sewing machine

First, you’ll need to take your measurements. Measure around your chest at the widest part, and also measure from the top of your shoulder to your waist. Write down these numbers so you don’t forget them!

Next, take your string or yarn and measure out a length equal to your chest measurement. Cut the string, and then tie the ends together to make a big loop.

Now, use your pencil to mark a spot on the string where it crosses in the middle of your chest. This is the center front of your vest. Then, measure out 1/4 of your chest measurement to the left and right of the center front, and mark those spots. These are the side seams of your vest.

Next, measure down from the center front mark the length of your shoulder to waist measurement, and mark that spot. This is the bottom of your vest. Finally, measure out 1/4 of your chest measurement above and below the bottom mark, and mark those spots. These are the armholes of your vest.

Now that you have all your measurements marked, you can cut the string. You should now have a big loop of string with four marks on it – this is your vest pattern!

Lay your vest pattern on top of your fabric, and use a pencil to trace around it. Then, cut out the fabric along the traced line. You should now have two mirror image vest pieces.

To sew your vest together, put the two fabric pieces right sides together and sew along the side seams and armholes. Then, turn your vest right side out and try it on. If it fits, great! If not, you can make adjustments by cutting the fabric and re-sewing it together.

Once you’re happy with the fit of your vest, you can finish the raw edges by serging them or using a zigzag stitch. Then, put on your new vest and enjoy!

How To Use Thrive Eyeshadow Sticks To Create Stunning Looks

How To Use Thrive Eyeshadow Sticks To Create Stunning Looks
Gemma / December 31, 2022

Whether you’re a beginner or a pro, these easy-to-use eyeshadow sticks will help you create stunning looks in no time. Made with a creamy, long-wearing formula, they glide on smoothly and blend effortlessly. Plus, they come in a range of beautiful shades that will complement any eye color.

Here’s how to use Thrive eyeshadow sticks to create three gorgeous looks:

The classic smokey eye

For a classic smokey eye, start by applying a light shade of eyeshadow all over the lid. Then, use a dark shade to create a “V” shape in the outer corner of the eye. Blend the edges well for a seamless finish.

The halo eye

For a halo eye, start by applying a light shade of eyeshadow all over the lid. Then, use a dark shade to create a “halo” around the pupil. Blend the edges well for a soft, romantic look.

The cut crease

For a cut crease, start by applying a light shade of eyeshadow all over the lid. Then, use a dark shade to create a “crease” in the inner corner of the eye. Blend the edges well and finish with a touch of sparkle in the center of the lid.

With Thrive eyeshadow sticks, creating beautiful looks is easy!

Thrive eyeshadow sticks are a great way to create stunning looks. They are easy to use and allow you to create a variety of looks. Here are some tips on how to use Thrive eyeshadow sticks to create stunning looks.

Choose the right color

The first step is to choose the right color for your look. You can choose from a variety of colors, including neutral, smoky, and bright colors. If you are not sure which color to choose, you can ask for help from a salesperson or a makeup artist.

Apply the eyeshadow

Once you have chosen the right color, you can start applying the eyeshadow. To do this, you will need to use the applicator that comes with the eyeshadow stick. Apply the eyeshadow to your eyelid and blend it outwards.

Add more colors

If you want to add more colors to your look, you can do so by using additional eyeshadow sticks. Simply apply the eyeshadow stick to your eyelid and blend it outwards.

Finish your look

Once you have created your desired look, you can finish it off by adding mascara or eyeliner.

Thrive eyeshadow sticks are a great way to create stunning looks. They are easy to use and allow you to create a variety of looks. Follow these tips on how to use Thrive eyeshadow sticks to create stunning looks.